An Open-Source Pixel Art Restoration Method That Might Be SOTA

Background
My last post about converting images to pixel art got a lot of attention, so I kept experimenting this week.
While learning pixel art, I ran into two problems.
Using pixel art as a reference
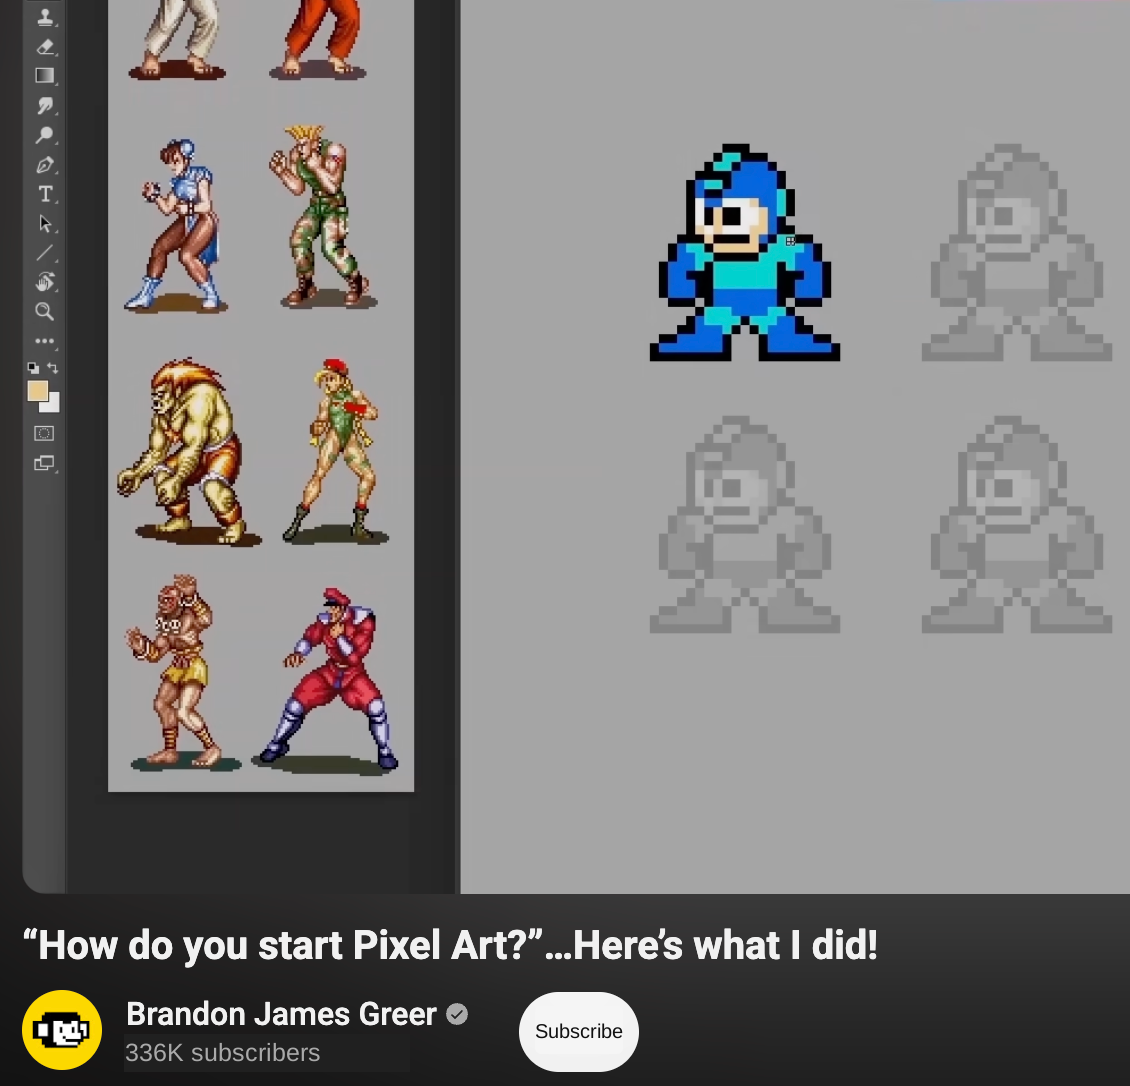
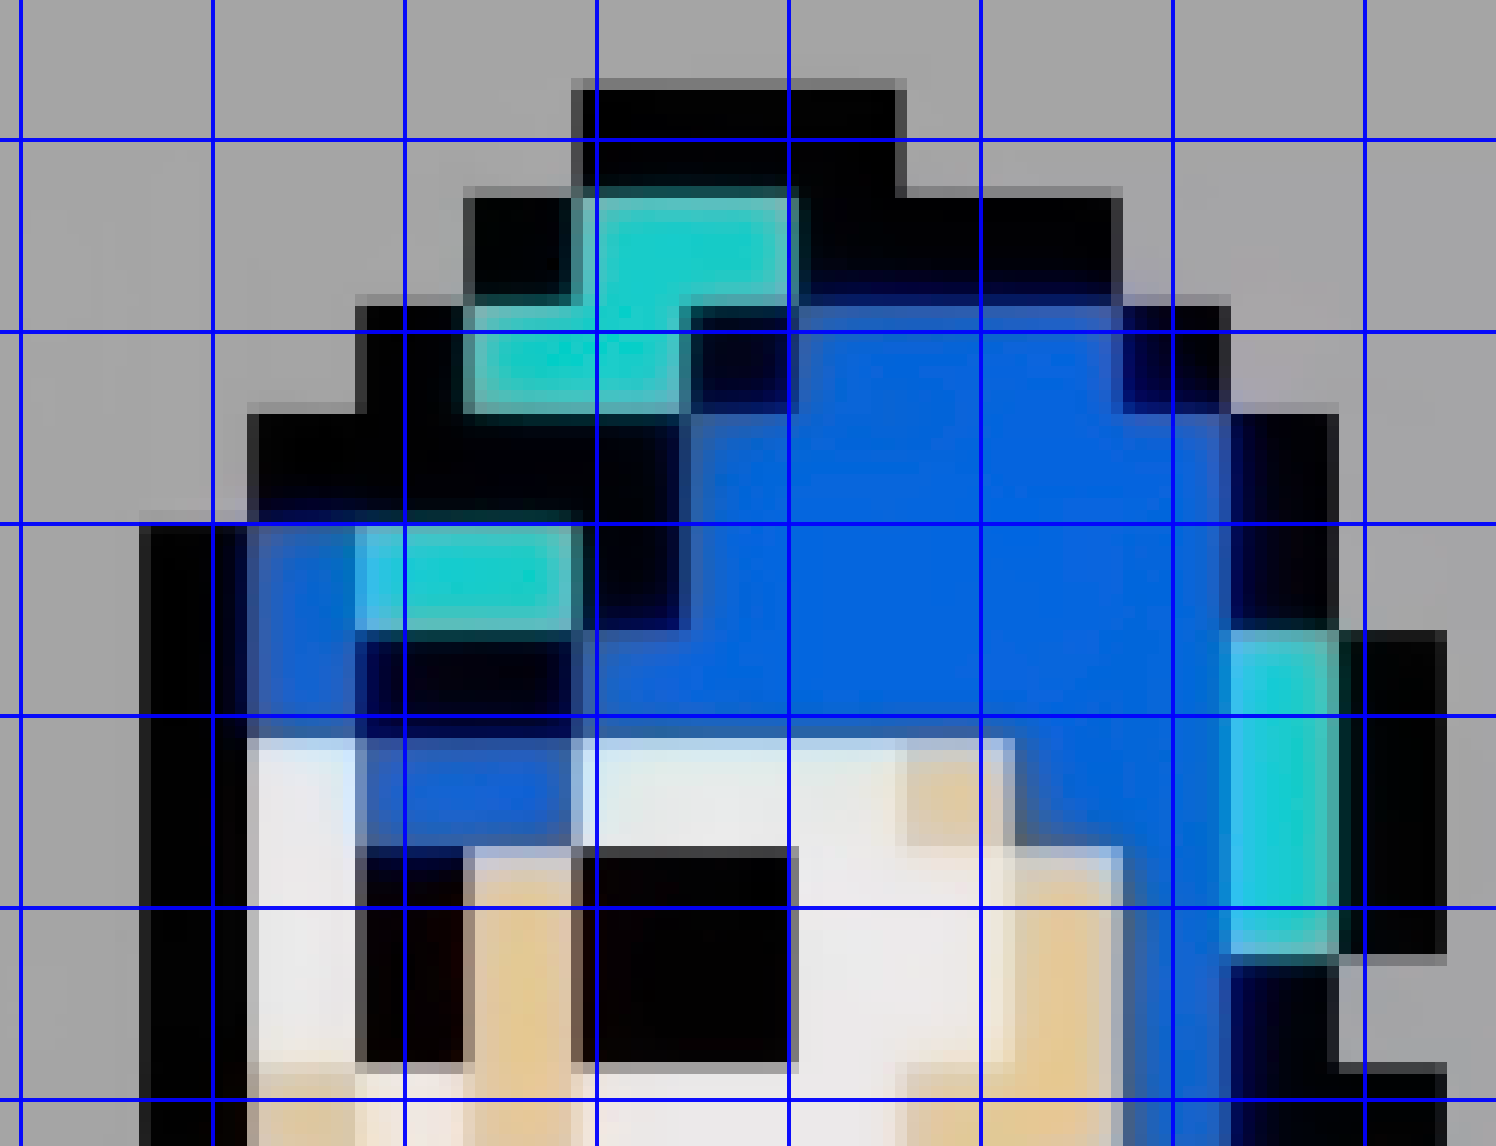
When I find pixel art I want to copy for practice, a screenshot or downloaded image can't just be imported into my editor:
- Each visible cell covers multiple image pixels, rather than being a single pixel.
- Social platforms often compress images, leaving artifacts around cell edges.
Fixing AI-generated images
I used the same prompt to generate Guts with several image models. Apart from Seedream, they look pretty convincing at first glance:
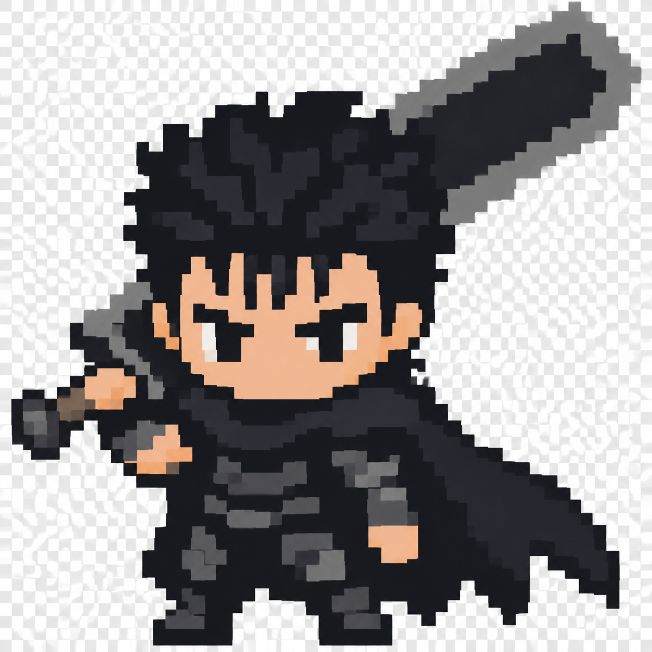
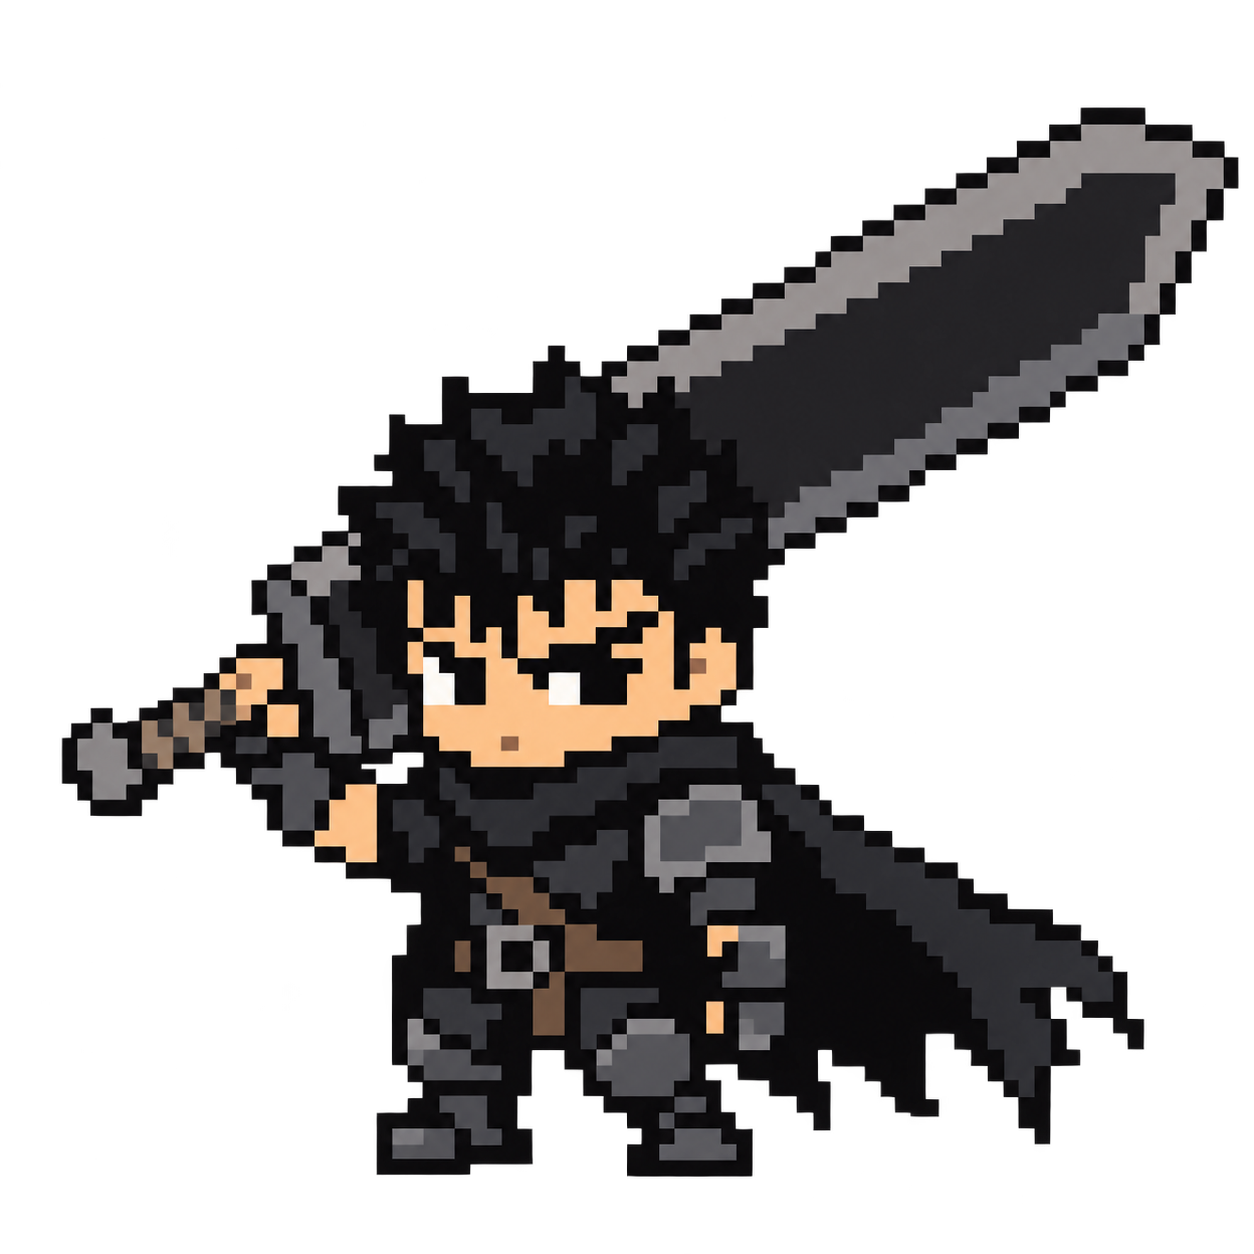
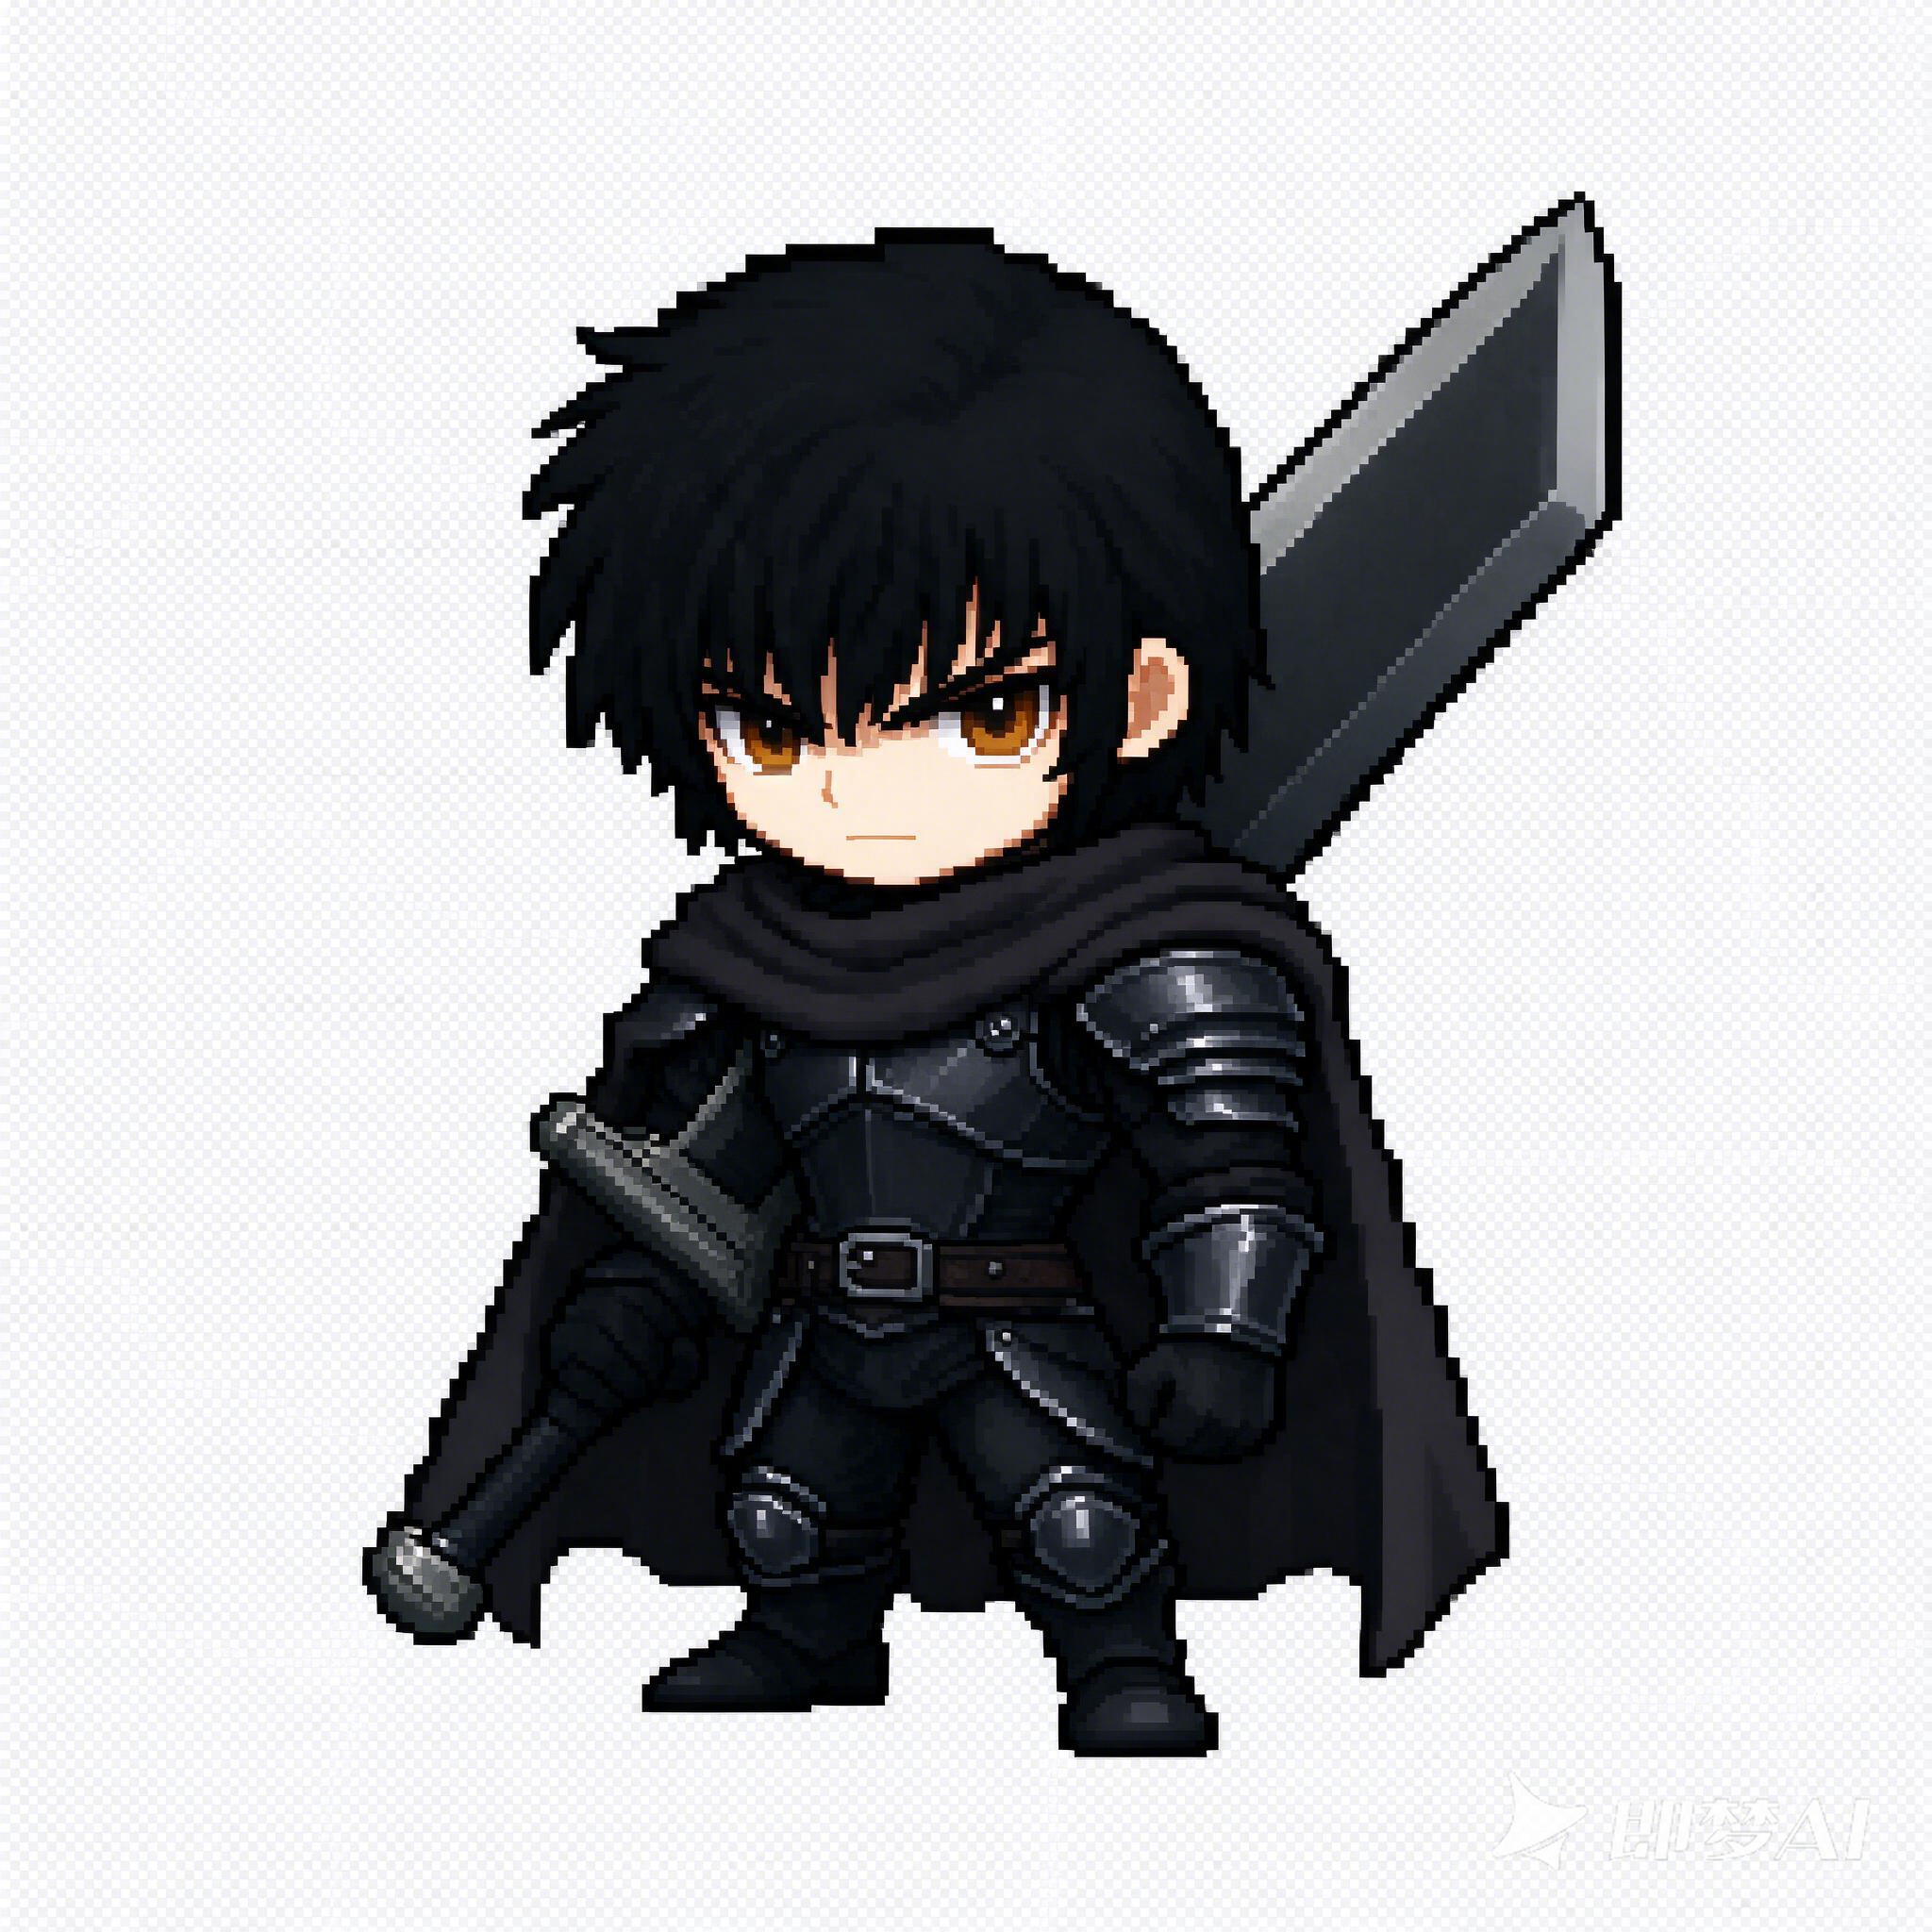
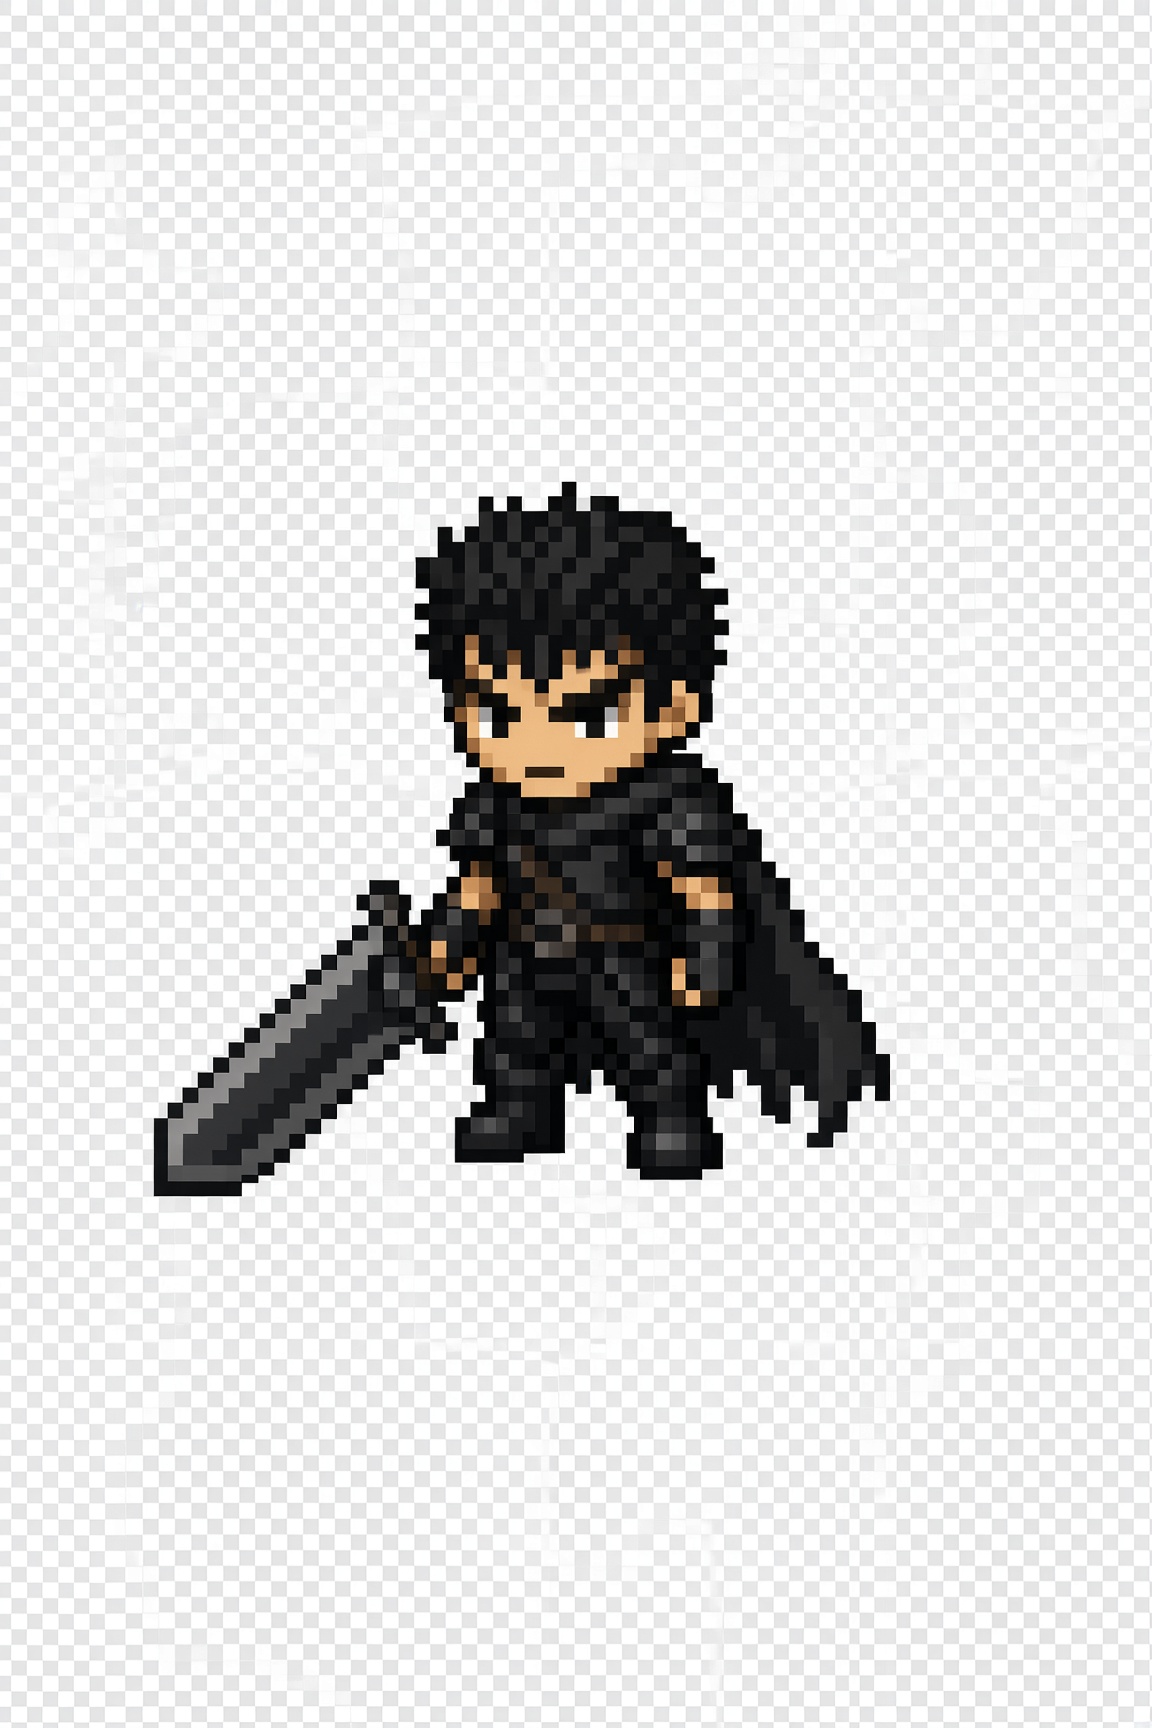
But none of these models produce true pixel art. Zoom in and the problems become clear:
| Nano Banana | GPT Image | Seedream | Grok | |
| Background | ❌ Fake checkerboard | Transparent | ❌ Fake checkerboard | ❌ Fake checkerboard |
| Semitransparent pixels | None | ❌ Present | None | None |
| Empty space | Little | Little | Moderate | ❌ A lot |
| Cell width drift (uneven pixel sizes) | ❌ 13% | 7% | ❌ 19% | ❌ 14% |
| Color variation (a smudged look) | ❌ 3.6% | 1.4% | ❌ 3.2% | 2.9% |
| Format (JPEG artifacts) | ❌ JPEG | PNG | PNG | ❌ JPEG |
The goal and the approach
I wanted an algorithm that takes a fake pixel image and returns real pixel art.
The problems fall into two broad groups:
- Grid: cell sizes and offsets don't line up.
- Color: colors are noisy, while a typical pixel art palette has only a few distinct colors.
That gives us a pipeline:

Step one: recover the grid
Existing approaches
Let's look at how some popular open-source solutions work. First, an overview:
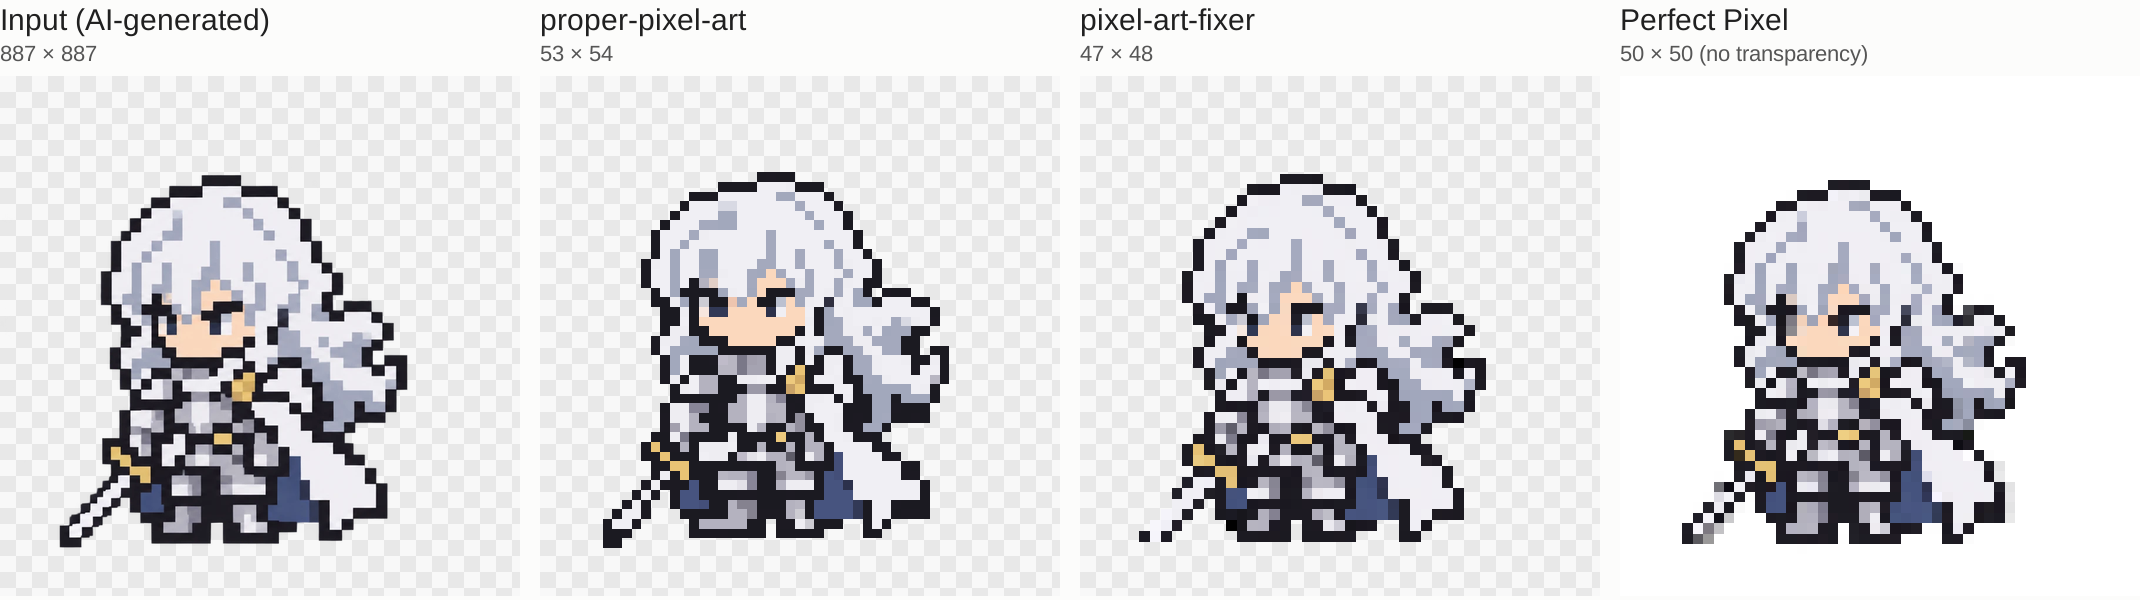
proper-pixel-art
proper-pixel-art is an MIT-licensed library by Kenneth Allen. It uses Canny edge detection and Hough lines to recover the grid, then samples at the native resolution.

Its grid recovery works like this:
- Canny edges: detect edges, then connect them with morphological closing.
- Probabilistic Hough lines: find line segments, keeping those within 15° of horizontal or vertical as an initial set of grid lines.
- Snap to projection peaks: move each line to the strongest nearby peak. This changes line positions without adding or removing lines.
- Fill gaps: use the median spacing as the cell width and insert missing lines in sparse areas.
This makes sense, but it has trouble in some cases:
- Sparse lines on diagonal edges: Hough segments must be at least 50 pixels long and receive enough votes. Images with mostly diagonal or curved edges may have few long straight segments to guide the grid.
- Integer cell widths: the implementation uses
int. Even after doubling the image before detection, the resulting width can only be a multiple of 0.5 in the original image.
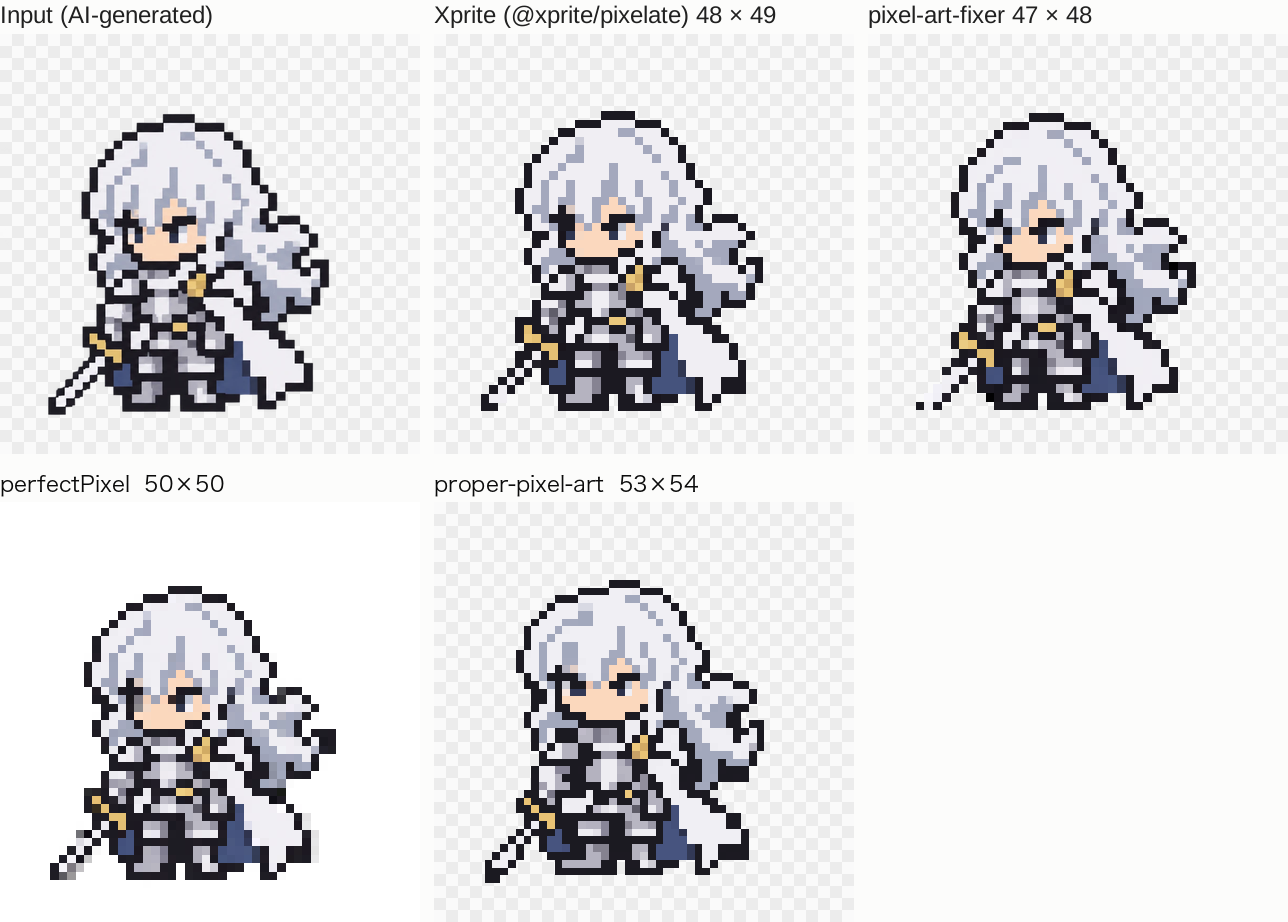
On the Griffith image:
- The width rounds to 17 px, versus roughly 18.5 px in the source. The artwork is divided into 37 × 40 cells, about four columns and five rows too many.
- Each pair of initial lines is subdivided independently, producing narrow cells as small as 8 px. A drawn pixel can be split into a narrow and a wide cell, creating doubled pixels around the eyes, for example.
pixel-art-fixer
pixel-art-fixer is maintained by Retro Diffusion and licensed under MIT. Three phase-independent detectors vote on cell width; when they disagree, a stack of evidence arbitrates. Grid placement and color selection are handled separately. It also has a fast Rust implementation.

- Candidate detectors:
- Autocorrelation: find the shifts at which the image looks most like itself.
- Run lengths: look for repeated spacing in the lengths of continuous color runs.
- Self-similarity: check whether local blocks repeat at a candidate cell width.
- Arbitration:
- Spectral evidence: look for stable cell-width peaks in the frequency domain.
- Within-cell variance: prefer flat cells that differ from their neighbors.
- Harmonic cleanup: rule out false peaks such as half or double the true width.
Fixer finds the cell width accurately, but it uses one uniform grid for the entire image, dividing from the left edge without estimating phase or snapping individual cuts. When a cut passes through the middle of an outline cell, details can disappear—for example, the outline next to the left eye.
Perfect Pixel
Perfect Pixel is an MIT-licensed library by theAmusing. It estimates the cell count with FFT, snaps lines to edges with Sobel, then samples each cell.
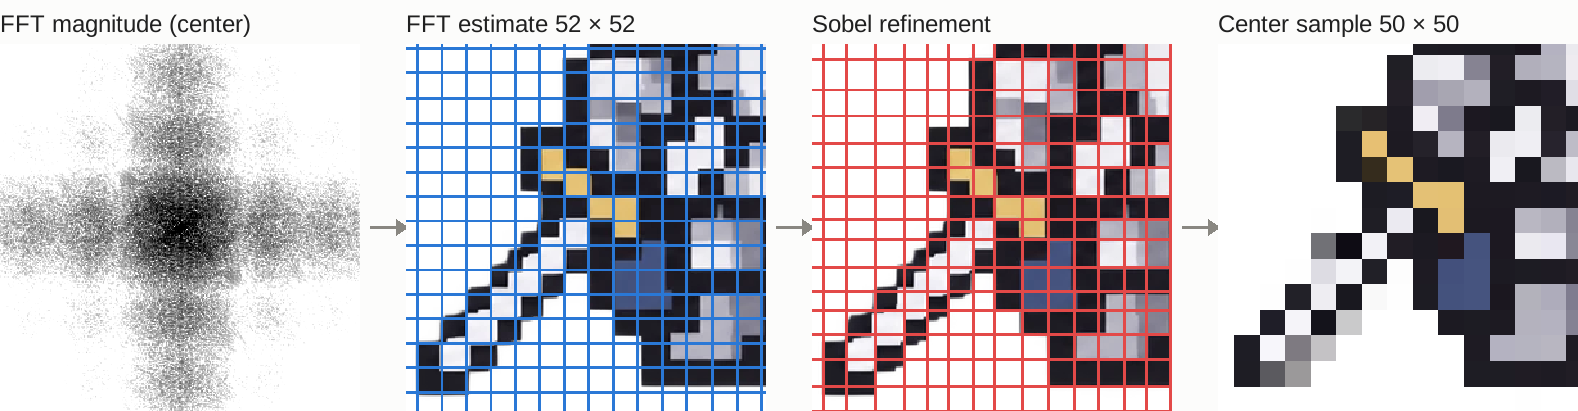
- Estimate cell count with FFT: transform the grayscale image and find peaks in row and column projections. If that fails, fall back to the median distance between gradient peaks.
- Refine with Sobel: snap each line to the strongest edge within ±25% of a cell width.
- Sample each cell: by default, take its center pixel.
The limitations show up here too:
- Integer grid: as with proper, fractional cell widths can be distorted.
- No alpha channel: transparent backgrounds are treated as white, and gray or white specks can remain near the outline. The one-handed sword, for example, has stray colors along its edge.
My approach
Each solution has strengths and weaknesses, so I decided to build on them and combine the parts that worked.
What I kept:
- Multiple candidates and an arbitration stage, from Fixer.
What I wanted to improve:
- Choose between complete grids, not just cell widths.
- Support fractional cell widths.
- Binarize semitransparent pixels.
I gave the idea to AI—passing it between Grok, Codex and Claude and wrestling with them for two weeks—and eventually arrived at this:
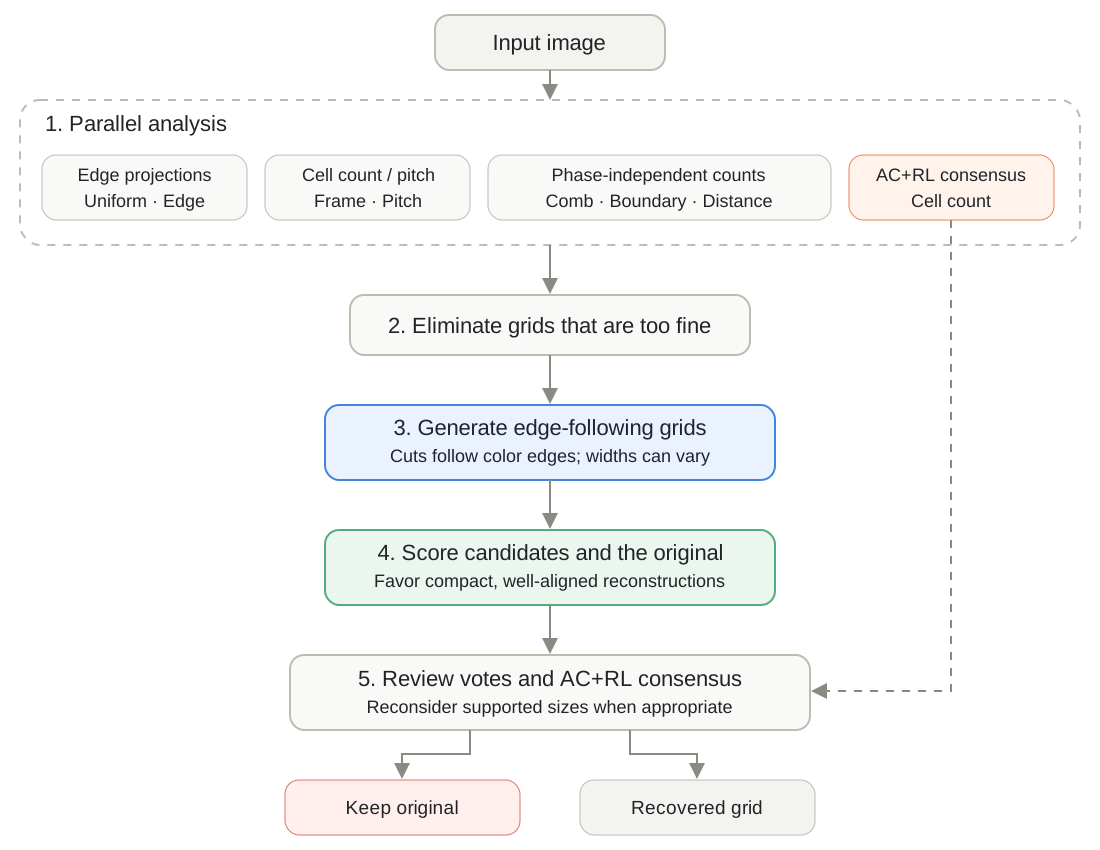
It looks complicated, but you can think of it as a tournament:
- Hold the qualifiers.
- Round 1: eliminate grids that are too fine.
- Use the qualifying cell widths to send in a few edge-following wildcards.
- Round 2: score every candidate alongside the defending champion: the original image.
- Round 3: give sizes supported by multiple votes a chance to come back.
For Griffith, the winner was an edge-following wildcard based on Pitch ✌️:

Here's how the initial contestants propose grids:
| Contestant | How it proposes a grid |
|---|---|
| Uniform | Stack color edges by row and column, then find an evenly spaced grid. |
| Edge | Place each cut on a clear color edge; cell widths can vary. |
| Frame | Assume the entire image is a uniformly enlarged grid of n cells and try each n. |
| Pitch | Search cell width and the first line's position, coarsely at first and then more finely. |
| Comb | Find repeating periods in color changes. |
| Boundary | Count the lengths of same-color runs along image edges. |
| Distance | Measure the distance between adjacent color edges in the same row. |
And the three judges:
| Judge | What it evaluates |
| #1 Edge consistency | The proportion of color edges that fall on cuts. A finer grid is eliminated if a grid with cells at least 1.5 times wider has substantially better consistency. |
| #2 Description length | Score = encoded information − phase evidence + harmonic penalty; lower is better. • Encoded information: the information needed to reconstruct the image, including cell colors, residuals and grid parameters. • Phase evidence: how much the information increases when all cuts shift by half a cell. A true grid increases more. • Harmonic penalty: if shifting only some cuts barely changes the information, the grid is likely a subdivision of the true grid. |
| #3 Voting | If the winner was proposed by only one detector, but a size one cell away has support from several detectors and a similar score, choose the latter. If the AC+RL consensus disagrees with the winner's cell count, select the lowest-scoring grid at the consensus size. For images with lots of transparent space, switch only when the difference is at least two cells. |
Step two: choose colors
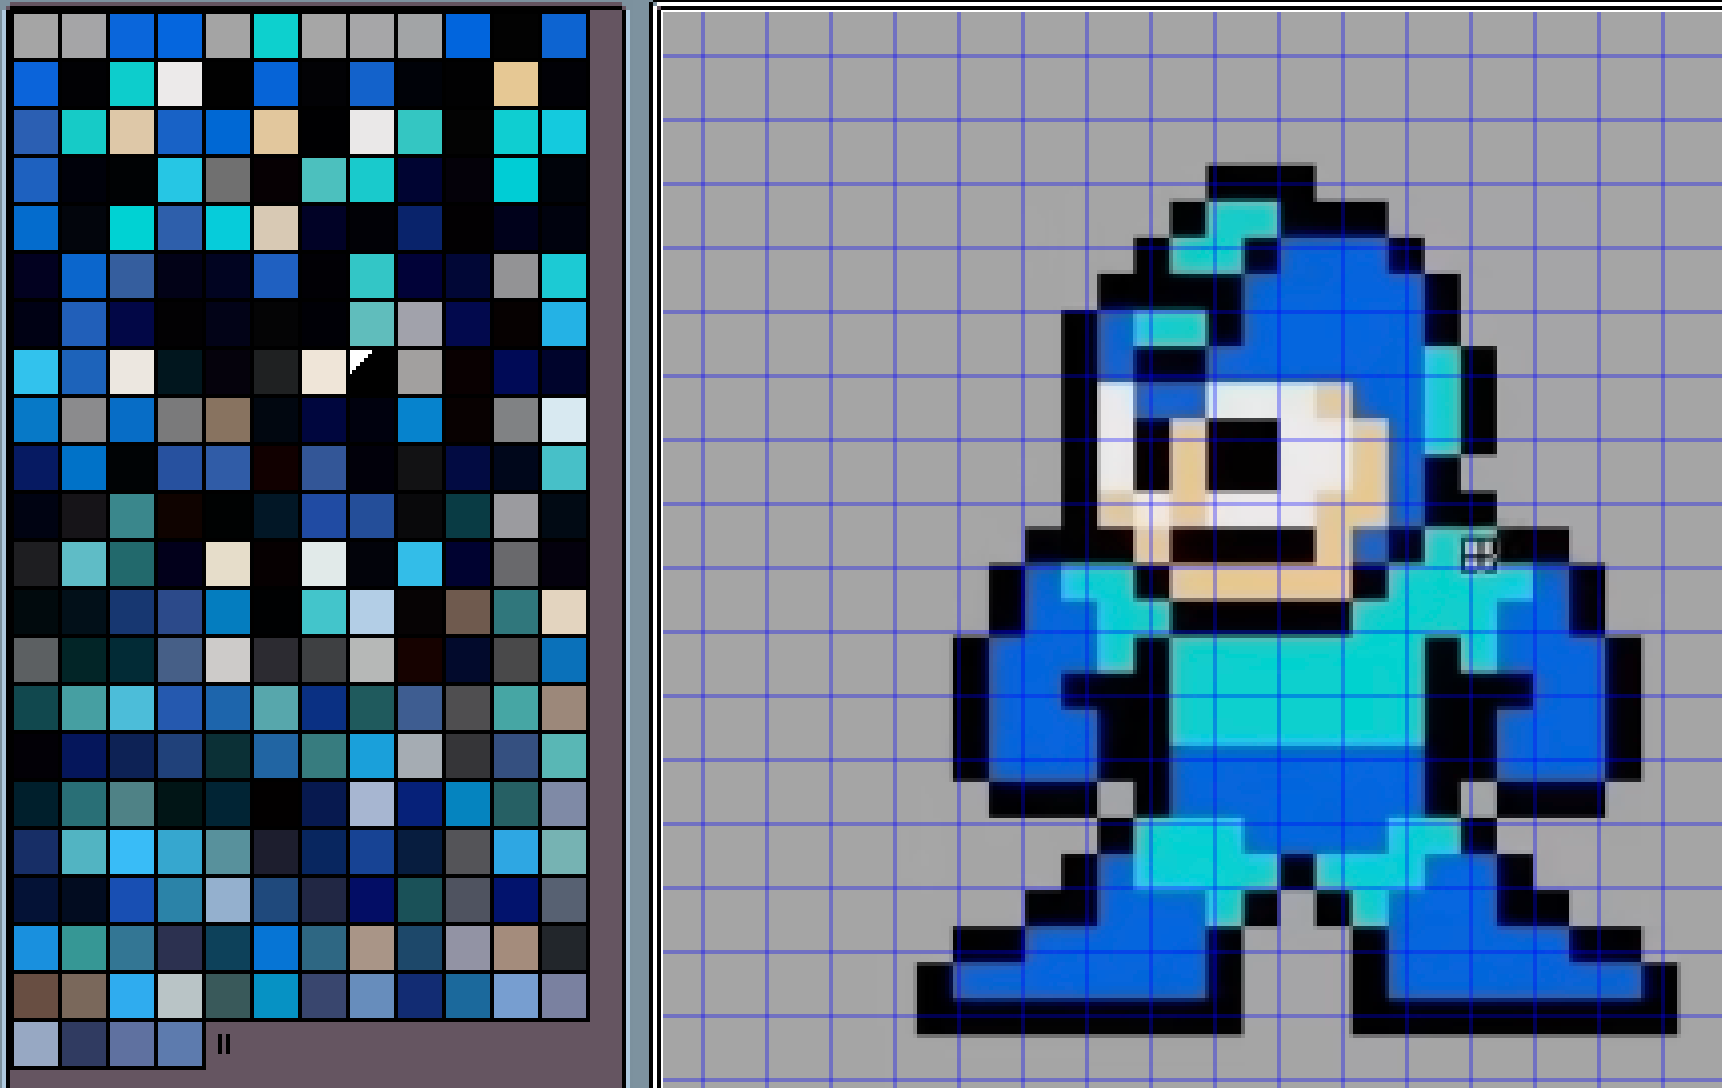
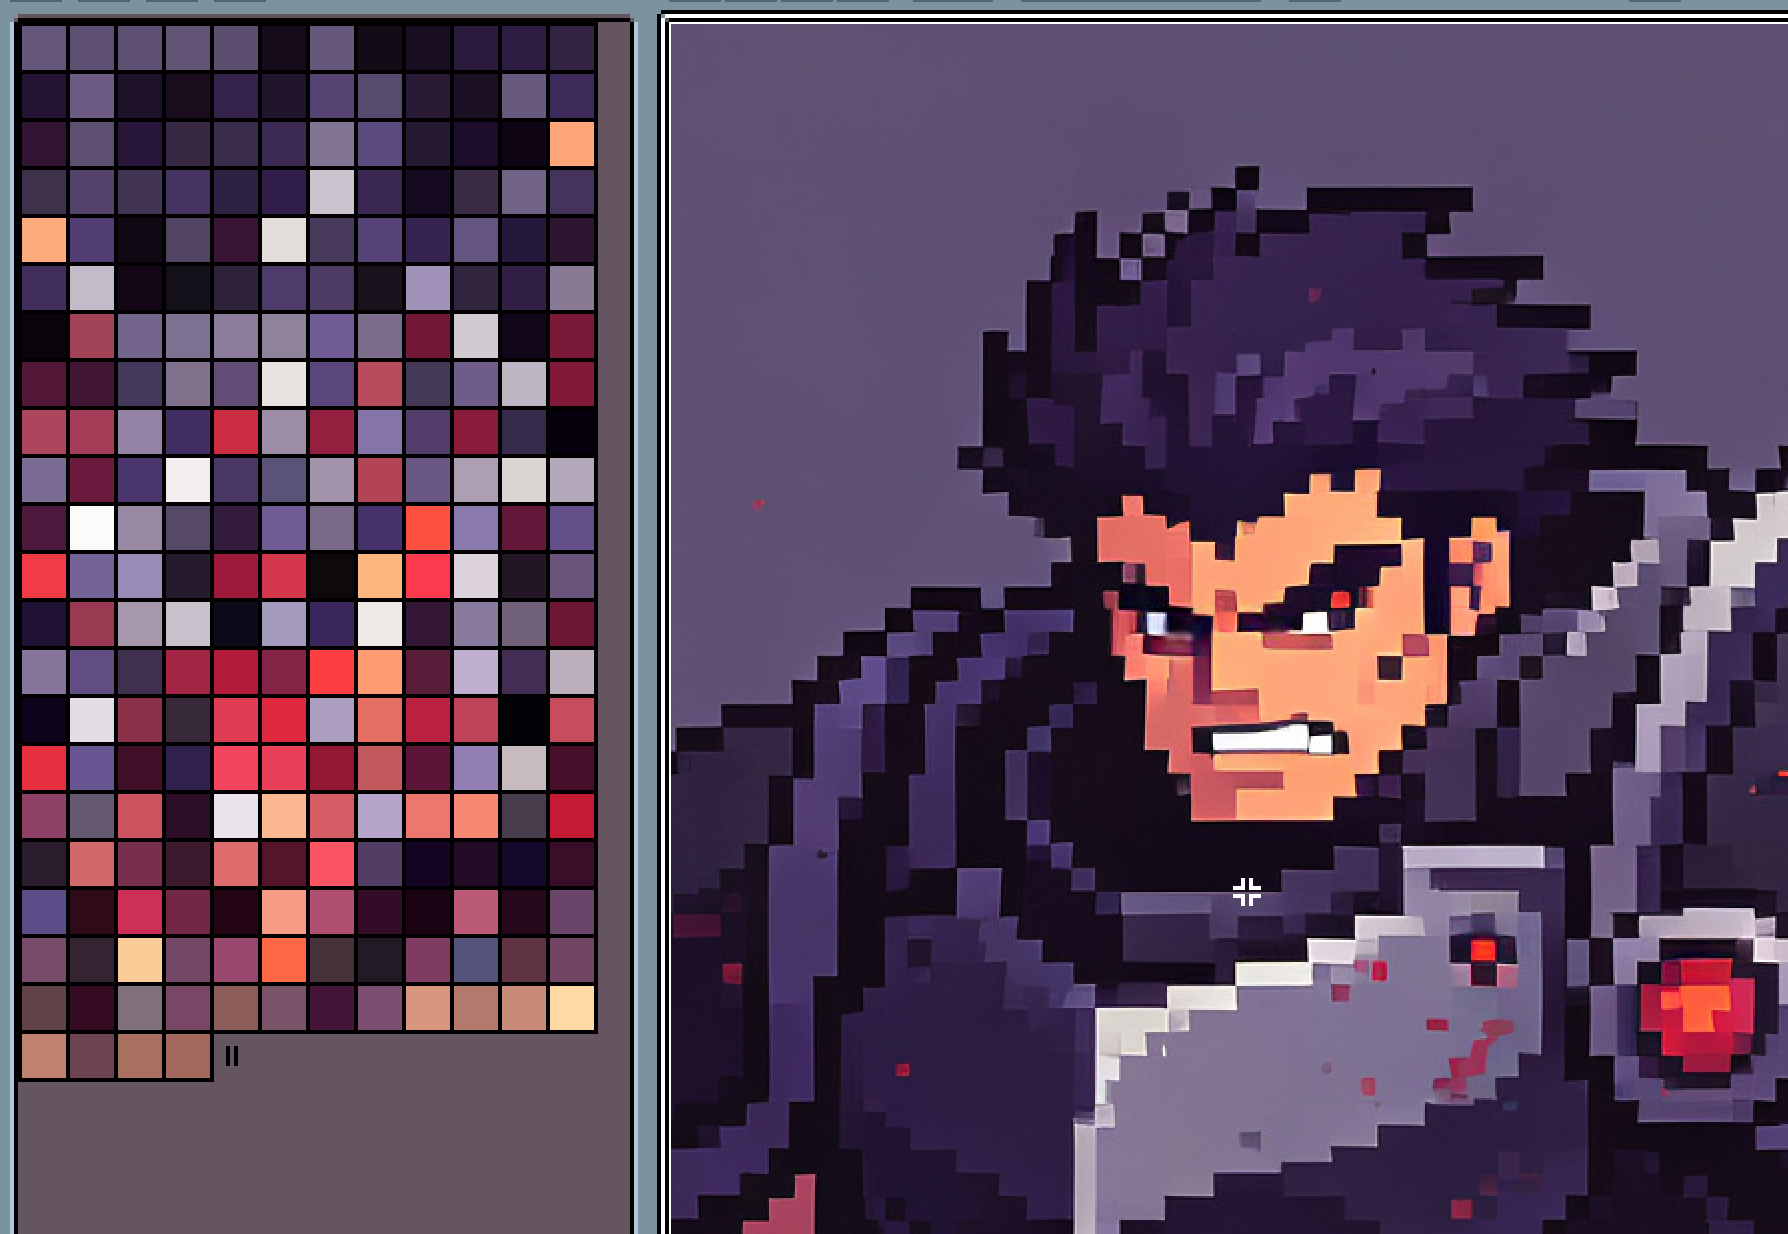
Once the grid is fixed, each cell needs a color. Both screenshots and AI-generated images usually contain color noise, and a cell may contain more than a hundred source pixels. Color selection picks one representative color for the corresponding output pixel.
Sampling methods
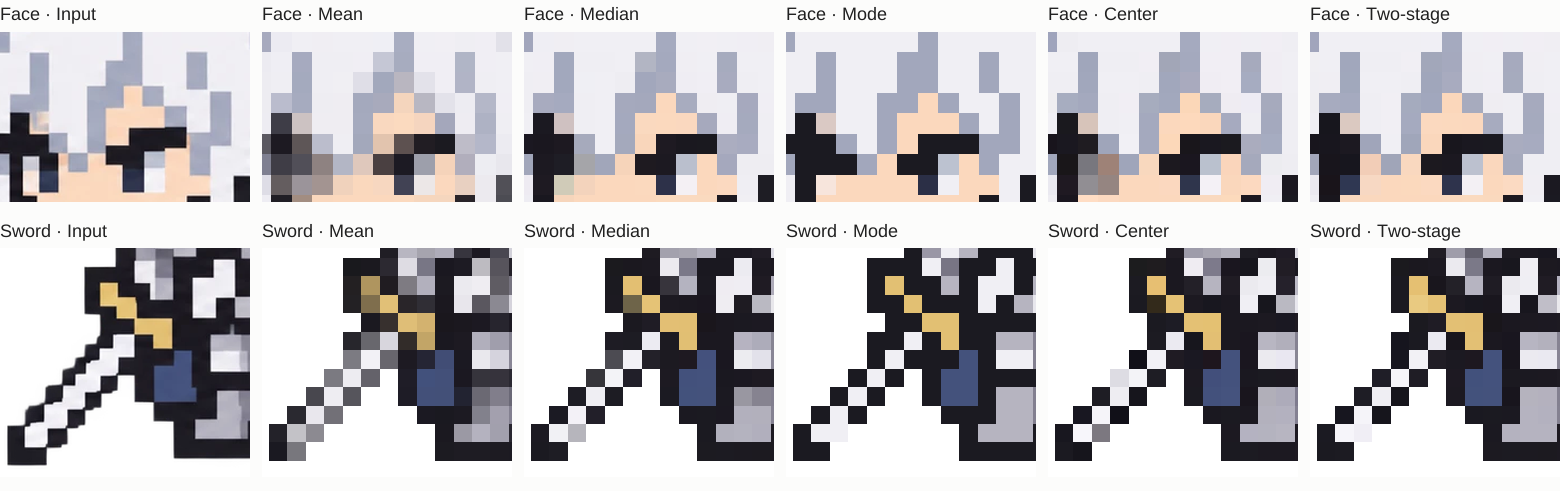
- Mean: average every pixel. Soft edges easily turn gray as transition colors are mixed in. On Griffith, this produces 486 colors, with 135 cells noticeably different from their dominant color (ΔE > 10).
- Median: take the median of each RGB channel. It resists isolated noise, but the combined color may not exist in the cell.
- Mode: use the most common color. The result is always a color that actually appears in the cell.
- Nearest: take the center pixel. It's the fastest, but fails when the center lands on a transition color; a few gray-white cells appear on the blade.
- Two-stage: first quantize the whole image into a few dozen colors. Each cell votes for a class, weighted toward its center. Then average only the original pixels belonging to that class.
Based on the benchmark results below, I settled on two-stage sampling.
Merge colors
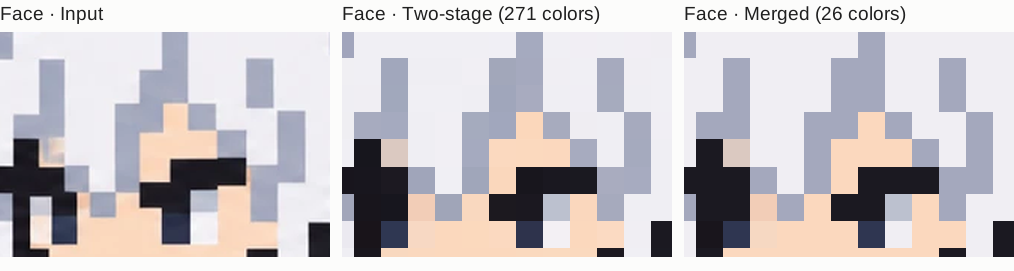
First, group nearly identical colors in CIELAB. Then use k-means to reach the desired palette size, allowing rare colors to form their own clusters.
On Griffith, two-stage sampling produces 271 colors; merging brings that down to 26, with almost no visible difference.
Binarize transparency
As mentioned earlier, AI-generated images can have semitransparent gradients around their outlines. I binarize those pixels: more than 50% transparent becomes fully transparent; otherwise, the pixel becomes opaque.
Results
Here's the result. Apart from a one-pixel flaw on the one-handed sword, it looks pretty good to me.
Benchmark
The title says this might be the current SOTA open-source approach, so I need a benchmark to back that up.
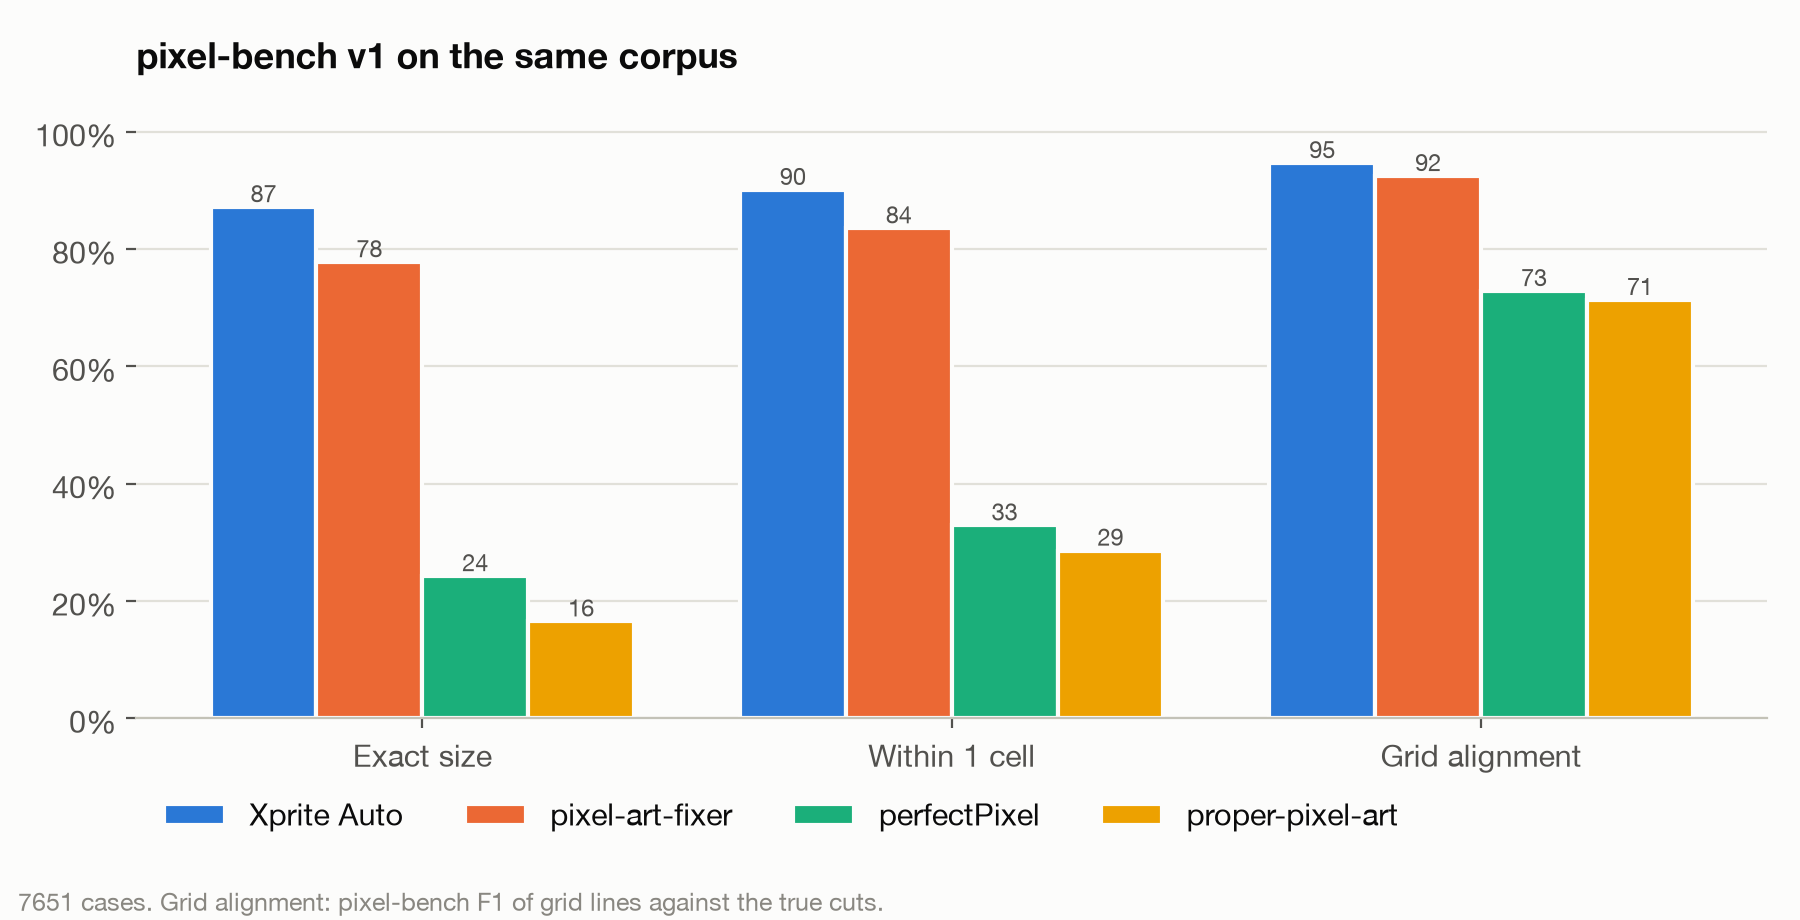
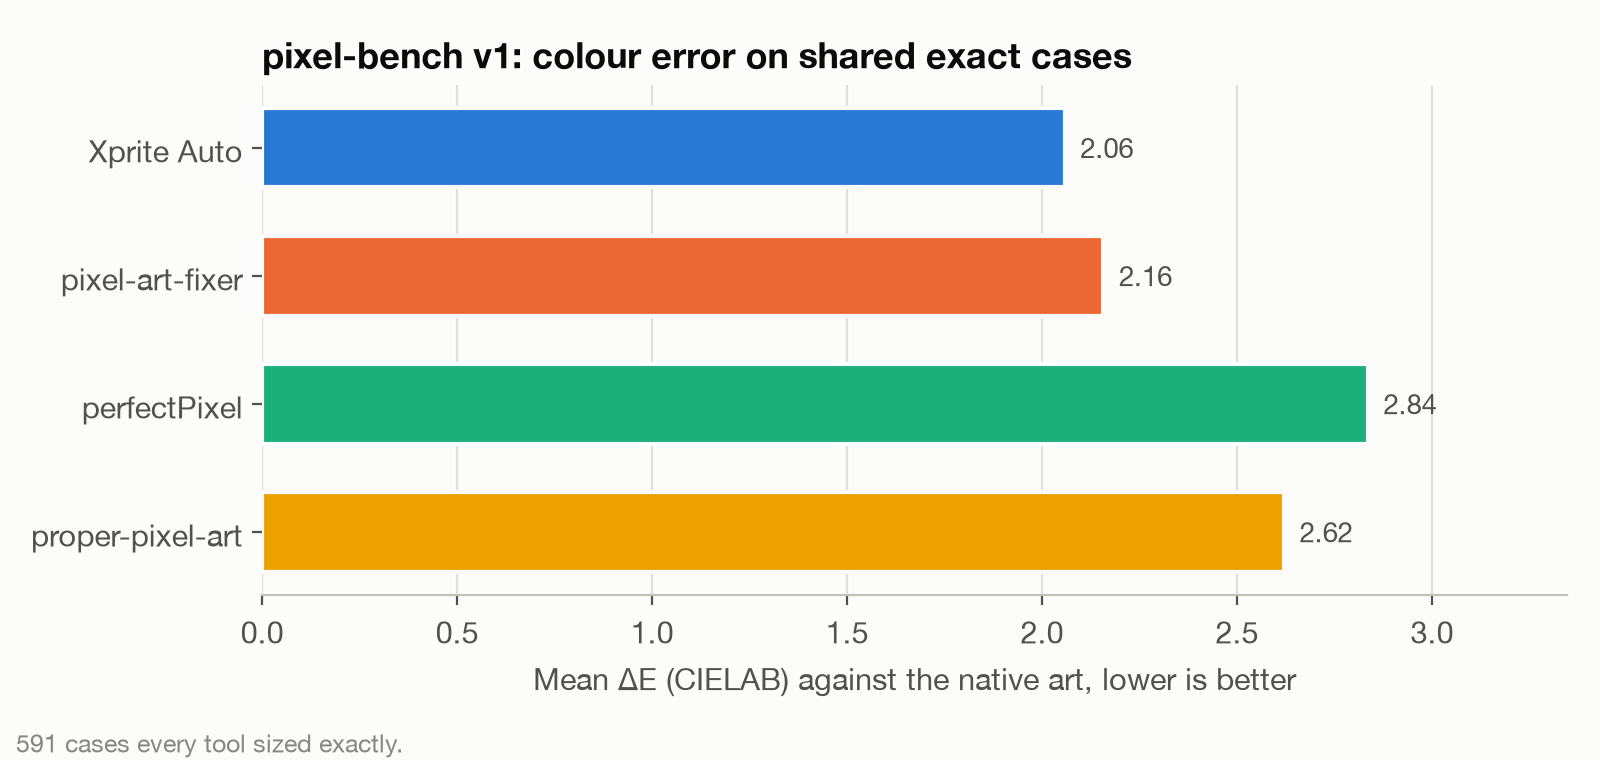
This is a niche field, and after a long search I found only pixel-bench. It's made by the same people as Fixer, which scores highly on it. The benchmark works like this:
- Start with genuine native-resolution pixel art.
- Apply synthetic damage that mimics fake pixel art: enlargement, blur, JPEG compression, drift, AI mush and so on.
- Measure whether a restoration algorithm can recover the original.
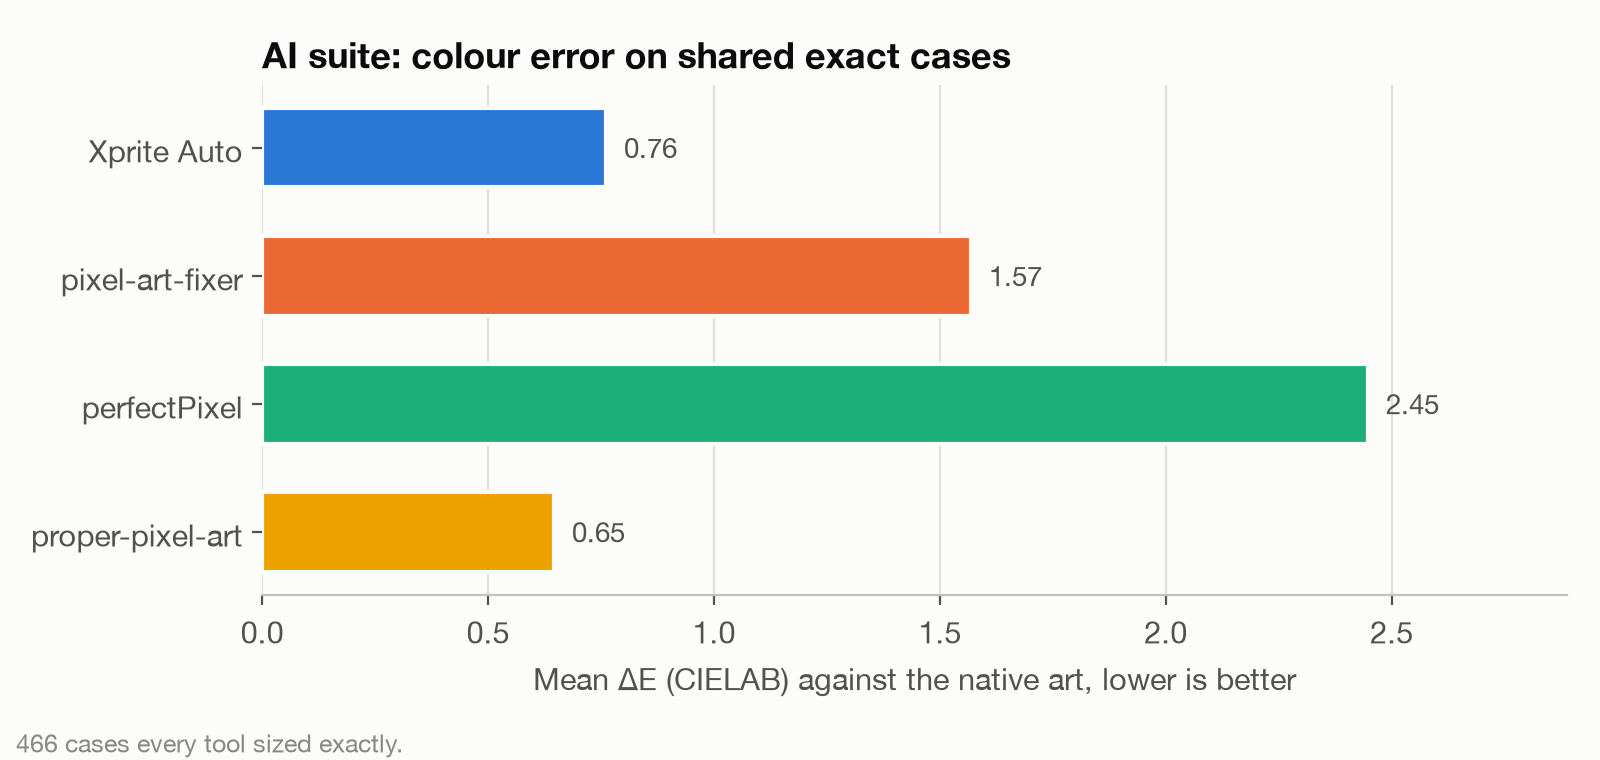
It didn't cover some of the problems I'd encountered, such as semitransparency, large empty areas and cell-width drift. So I added a set of synthetic cases called ai_fake:
| Category | What it simulates |
|---|---|
| gen_clean | Soft edges, nearly flat cell interiors, cell widths of 8–20 px |
| gen_sparse | Artwork occupying 20%–35% of the canvas |
| gen_white | An off-white background instead of transparency |
| gen_soft_edge | A 3–5 px semitransparent outline |
| gen_webp | Drift, cut jitter, noise and WebP compression |
| gen_halo_jpeg | Sharpening halos and JPEG compression |
| gen_painterly | Brush-like variation inside cells |
| gen_small_pitch | Cell widths of 4–8 px |
| gen_large_pitch | Cell widths of 24–48 px |
| gen_wobble | Strong drift and jitter |
| gen_pair | Two characters side by side on one canvas |
| gen_shadow | A semitransparent shadow under a character |
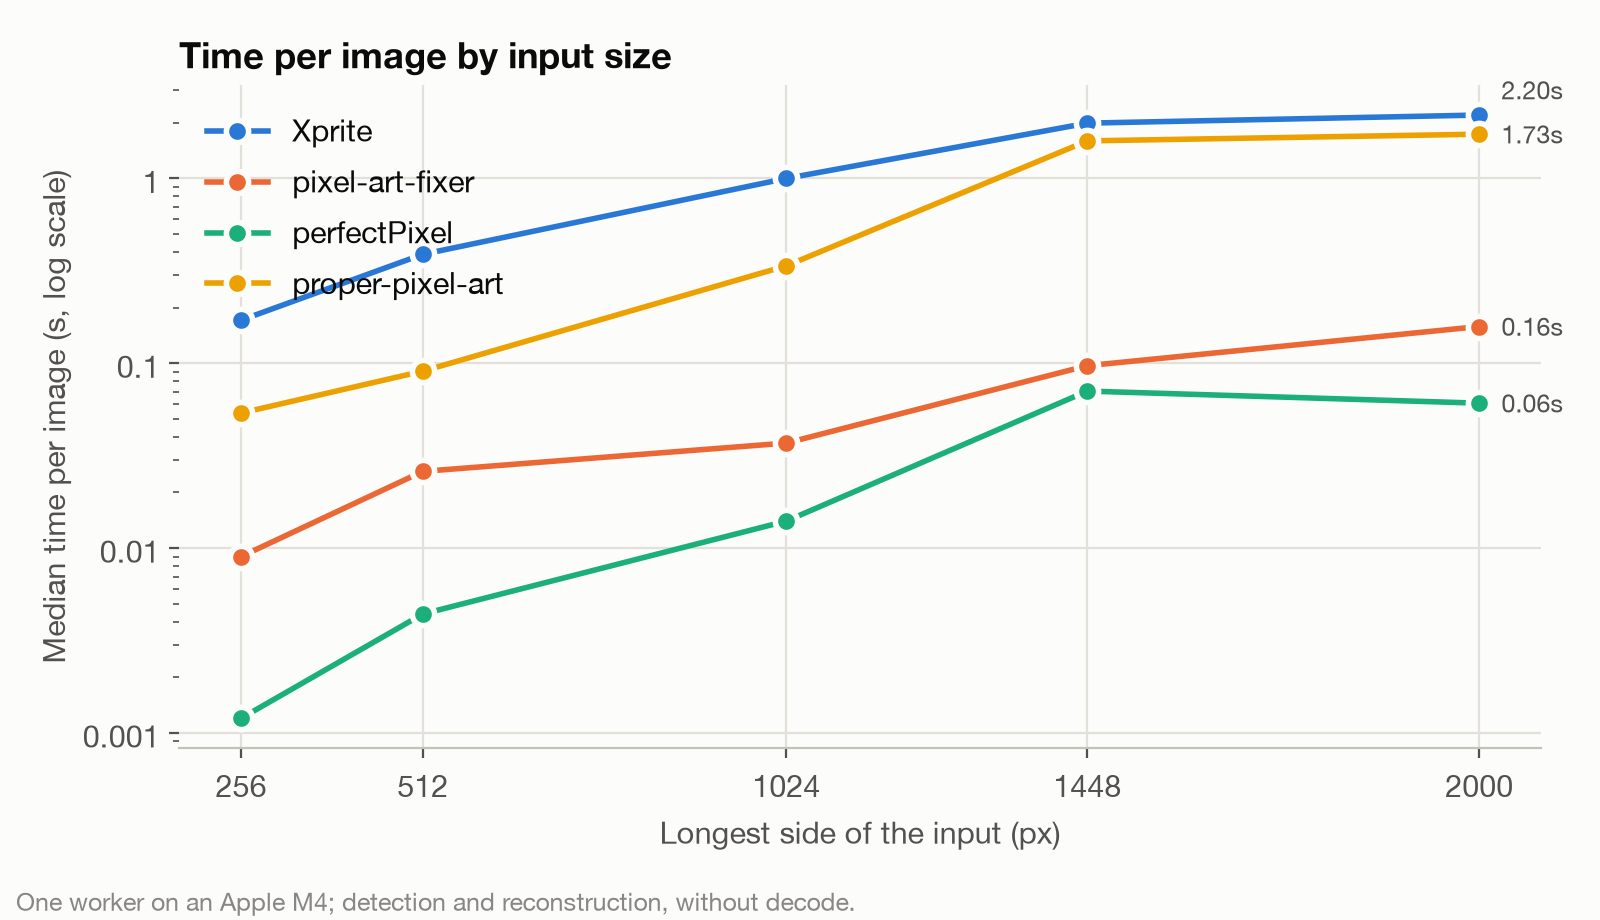
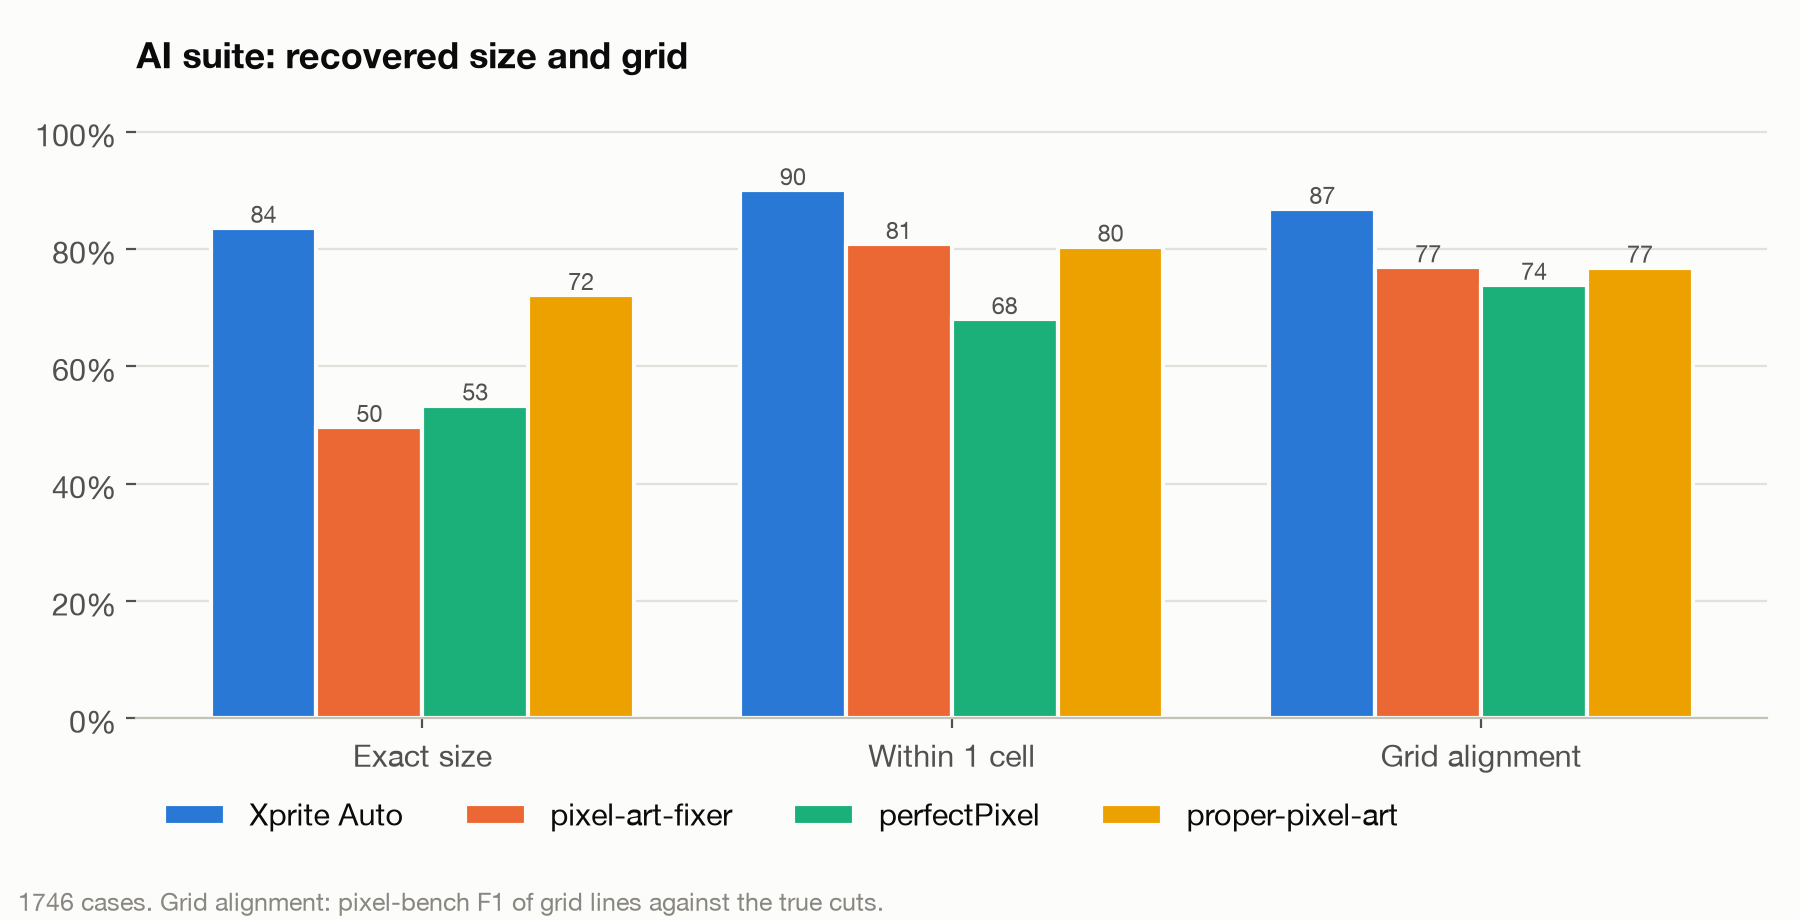
My method did well on both the original pixel-bench and the expanded AI suite. I call it Xprite Auto because it's the automatic preset on my Xprite site—a name I picked more or less on the spot.
There are so many candidates to evaluate, though, that it's currently last in speed 🧎🏻